
Keyboard foam modding has evolved from a niche enthusiast hobby into a mainstream customization practice that transforms how gamers and typists experience their peripherals. Whether you’re grinding ranked matches on a mechanical board or chasing that perfect keystroke feel during long typing sessions, foam mods can be a game-changer, literally and figuratively. The principle is simple: strategic placement of foam dampening materials inside your keyboard reduces undesired resonance, changes acoustic properties, and fundamentally alters the tactile feedback you get with each press. For gamers specifically, this means smoother key presses, reduced noise pollution in Discord calls, and a more personalized feel that matches your exact preferences. If you’ve heard the term “foam modding keyboard” floating around but weren’t sure where to start, this guide breaks down everything you need to know to execute mods correctly, avoid common pitfalls, and actually hear (and feel) the difference in your setup.
Key Takeaways
- Foam modding keyboard involves strategically placing dampening materials in stabilizers, PCB, and case to reduce resonance, lower noise by 5-10 dB, and create a softer, more controlled keystroke feel.
- Start with essential tools including a keycap puller, small screwdrivers, tweezers, and isopropyl alcohol, then progress to quality PCB and stabilizer foam materials from reputable brands like Deskeys and TX.
- Proper preparation and cleaning of your keyboard before foam installation is critical; dust and debris prevent adhesion and create unwanted texture that undermines the entire mod.
- Avoid common mistakes like over-stuffing with foam (which causes stuck keys and potential electrical shorts), using generic foam instead of keyboard-specific materials, and rushing reassembly before adhesive sets.
- Evaluate your foam modding results by recording audio samples before and after, testing for reduced hand fatigue during extended gaming sessions, and methodically checking that stabilized keys respond correctly.
- Foam modding works across different keyboard types—from hot-swappable gaming boards to wireless and budget keyboards—but requires tailored approaches based on your board’s architecture and internal space constraints.
What Is Keyboard Foam Modding?
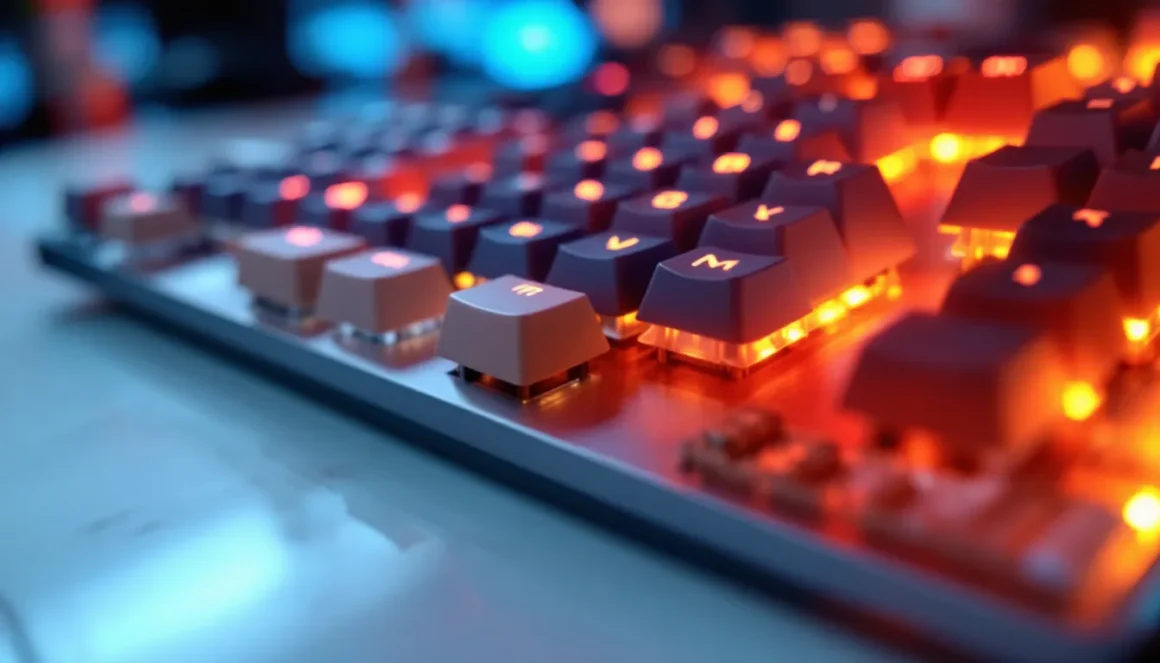
Keyboard foam modding is the practice of inserting foam layers into various parts of your keyboard to dampen vibrations and alter the acoustic signature of your switches and case. Unlike switch modifications that alter the stem or spring, foam mods work on the macro level, they absorb energy that would otherwise bounce around inside your keyboard housing.
At its core, foam modding involves three main zones: the stabilizers (those stabilizing components under the spacebar, shift, and enter keys), the PCB (printed circuit board), and the case itself. Each location serves a different acoustic purpose. Stabilizer foam quiets rattle and clacking from longer keys. PCB foam dampens the overall resonance of the board and changes how sound travels through the structure. Case foam absorbs reflections inside the enclosure, creating a “duller” or more controlled acoustic signature.
The result isn’t just about sound, though that’s a huge factor. Gamers often report that foam mods create a more cohesive, “thocky” feel (that satisfying, deeper sound many prefer) and reduce the ear-fatiguing high-frequency noise that comes from raw plastic-on-plastic interactions. It’s why you’ll see competitive players and streamers integrating foam into their setups: the improvements are tangible and measurable.
Why Gamers And Enthusiasts Use Foam Mods
The appeal of foam modding extends beyond aesthetics or audio quality. For gamers and enthusiasts, there are three primary motivations driving adoption, each addressing a specific pain point in the stock keyboard experience.
Enhanced Typing Feel And Feedback
Foam changes the tactile experience in subtle but significant ways. When you press a switch, the keycap travels downward, bottoming out against the PCB. Without foam, that collision resonates sharply, the sound and feel are jarring. Foam absorbs that impact, creating what enthusiasts call a “softer bottom-out.” This isn’t about reducing travel distance: it’s about reducing the harshness of impact.
For competitive gamers, this matters because a softer, more controlled keystroke can reduce hand fatigue during long gaming sessions. Esports athletes playing eight-plus hours in practice or tournament play benefit from reduced finger strain. The switch itself still registers at the exact same speed and point, the game logic doesn’t change, but your hand and wrist experience less cumulative stress. Meanwhile, casual and hardcore players alike appreciate the improved feel that makes typing feel more intentional and less “clicky” (unless you actually want click).
Reduced Noise And Acoustic Improvements
This is the headline benefit for many. A stock keyboard, especially with clicky switches, generates significant noise. That’s great if you live alone, but in a shared dorm, office, or household, noisy keystrokes can damage relationships fast. Roommates and family members hate the constant tap-tap-tapping, and if you’re streaming or in Discord calls, your mic picks up every keystroke.
Foam mods are one of the most effective ways to reduce keyboard noise without replacing your switches entirely. Stabilizer foam eliminates the rattle from longer keys that many switches produce. PCB and case foam absorb resonance that would otherwise amplify through the housing. The cumulative effect can reduce overall decibel output by 5-10 dB, a noticeable difference that transforms the experience in quiet environments. Gamers who stream or play late-night multiplayer games appreciate this immensely.
Customization And Personalization
Unlike buying a new keyboard, foam modding is a creative project that lets you shape your existing board exactly how you want it. You choose the foam type, density, thickness, and placement. Do you want maximum thock (deeper sound)? Use thicker, denser PCB foam. Prefer minimal change? Use only stabilizer foam. This level of control is addictive for the enthusiast crowd and empowering for anyone tired of settling for a “good enough” keyboard experience.
Foam modding also unlocks a whole community. Sharing your modding process, comparing results, and discussing material choices are core parts of gaming and keyboard enthusiast culture. It’s creative, hands-on customization that costs $10-40 versus $150+ for a new board.
Essential Materials And Tools You’ll Need
Before you crack open your keyboard, gather the right supplies. Having everything on hand prevents frustrating mid-mod trips to the store and ensures you can complete the job cleanly and safely.
Foam Types For Keyboard Modding
Not all foam is created equal. Different densities and materials have distinct properties, and using the wrong type can reduce or even negate the benefits of your mod.
PCB Foam (most common for general dampening): Usually 1-2mm thick neoprene or EVA foam. This is the foundational material for most builds. It sits between the PCB and case, absorbing resonance. Brands like Deskeys, TX, and KBDfans manufacture standard PCB foams that fit most 60-80% keyboards. Density matters, higher density (3-5mm) creates more dampening but can affect how closely the PCB sits in the case.
Stabilizer Foam (wire stabilizer clips): Thin, adhesive-backed foam strips sized specifically for the clips of stabilizers. Brands like Deskeys Gasket Strips and TX stabilizer tape are popular. This foam prevents the stabilizer wire from vibrating excessively and rattling. It’s often applied to the underside of stabilizer wires before installation.
Case Foam (inside the bottom/top case): Thicker foam (2-5mm) that lines the interior of your keyboard case. This absorbs sound reflections bouncing off the plastic housing. Some builders use acoustic absorption foam (originally designed for soundproofing) from automotive or studio suppliers. The goal is to “deaden” the case resonance.
Plate Foam (under the PCB, between PCB and plate): Optional but popular. A thin layer (1-1.5mm) that decouples the PCB slightly from the mounting structure. This can reduce the “hollowness” some keyboards have and further dampen vibrations.
For first-time modders, start with PCB foam and stabilizer foam, the two most impactful materials. You can add case foam later once you understand how foam affects your specific board.
Tools And Supplies
Essential tools:
-
Keycap Puller: A plastic tool (usually included with high-end boards or available separately) that safely removes keycaps without damaging stabilizers or switches. Don’t use a flathead screwdriver: you’ll damage your keycaps.
-
Switch Puller (if you have hot-swappable switches): Allows you to remove individual switches without disassembling the entire board. Required for some modding approaches.
-
Small Screwdrivers (Phillips and flathead): Most keyboards use Phillips screws. A small toolkit with multiple sizes prevents stripped screws.
-
Tweezers or Small Forceps: Essential for handling small foam pieces and stabilizer wires. Precision is key: tweezers let you position foam exactly where it needs to go.
-
Isopropyl Alcohol (90%+ concentration) and Cotton Swabs: For cleaning the PCB and case before foam installation. Dust and debris reduce foam adhesion and create unwanted texture.
-
Cutting Mat and Craft Knife (or Scissors): If your foam doesn’t come pre-cut for your specific board, you’ll need to trim it. A self-healing cutting mat prevents damage to your work surface.
Optional but helpful:
-
Multimeter: If you’re checking for shorts after reassembly, a basic multimeter confirms your work didn’t cause electrical issues.
-
Measuring Tape or Calipers: For precise measurements, especially if you’re custom-cutting foam. This prevents over-stuffing or under-coverage.
Start with the essentials, keycap puller, small screwdrivers, tweezers, and isopropyl alcohol. You can add specialized tools as you tackle more complex builds.
Step-By-Step Guide To Modding Your Keyboard With Foam
Now we get to the hands-on part. This process assumes you’re working with a standard mechanical keyboard with a removable PCB. Specific steps may vary slightly depending on your board, so reference your keyboard’s manual if available.
Preparing Your Keyboard
The foundation of a good mod is a clean, well-prepared build space.
-
Power down and disconnect: Unplug your keyboard from your PC or disconnect via Bluetooth. Let it sit for 30 seconds to ensure any residual power drains.
-
Remove all keycaps: Use your keycap puller to gently remove every keycap. Start from one corner and work systematically. This exposes the stabilizers and PCB. Keep keycaps organized, a photo or labeled container prevents mixing them up later.
-
Inspect the board: Before disassembly, look for dust, debris, or corrosion. If you see visible grime, gently use compressed air to blow out the board. Pay special attention to stabilizer areas and under the PCB.
-
Disassemble the case: Flip your keyboard over and remove all screws holding the bottom case to the PCB assembly. Keyboards vary, some have 4 screws, others have 8+. Keep them in a small container. Take a photo of the screw pattern if you’re unsure where they go.
-
Separate the PCB from the case: Gently lift the PCB assembly (which may include a mounting plate and switches) away from the bottom case. Be careful with stabilizers and any connected components. Some keyboards have stabilizers soldered to the PCB: others use clip-on stabilizers. Know which type you have before proceeding.
-
Clean thoroughly: Use a cotton swab lightly dampened with isopropyl alcohol to wipe down the interior of both the top and bottom case, and the underside of the PCB. Let everything air-dry for 5-10 minutes. Dust and residue will prevent foam from adhering properly.
Installing Stabilizer Foam
Stabilizer foam is the most impactful single mod for reducing rattle and noise from longer keys.
-
Locate the stabilizers: These are usually under the spacebar, shift, enter, and backspace keys. Look for metal wires (the stabilizer clip) underneath each of these components. Most mechanical keyboards use Cherry-style or Costar stabilizers. Cherry-style are more common in gaming boards.
-
Apply foam to stabilizer wires: Cut small strips of stabilizer foam (or use pre-cut kits) sized to fit the underside of each stabilizer wire. The foam should cover the wire to prevent it from vibrating against the PCB or case. Some builders place a single strip under the center of the wire: others wrap it partially. Aim for light pressure, you want to dampen vibration, not constrain the mechanism.
-
Check stabilizer balance: Before fully assembling, lightly press each stabilized key a few times. The key should travel smoothly, and you shouldn’t hear excessive rattle. If the key feels gummy or stuck, you’ve applied too much foam. Remove and reapply with less coverage.
-
Optional stabilizer lube: While you’re here, many builders apply stabilizer lube (a thin, viscous lubricant specifically for stabilizers) over the foam. This further reduces noise and smooths the mechanism. It’s optional but effective. Brands like Krytox 205g0 and Tribosys 3203 are industry standard.
Adding PCB Foam And Case Foam
These layers provide broader acoustic dampening across the entire board.
-
Prepare PCB foam: If your foam isn’t pre-cut for your specific board, measure the PCB dimensions and carefully cut the foam to size using your craft knife and cutting mat. Leave small gaps around screw holes, foam compressed under screws can cause issues. The foam should fit snugly without forcing.
-
Install PCB foam: Place the PCB foam on the clean bottom case surface (or on the underside of the PCB, depending on your layout). Press gently to ensure good contact. This is the single most important foam layer for overall sound dampening.
-
Add case foam (optional): If you have additional case foam, line the interior of the bottom case with thin layers. Avoid over-stuffing: too much foam can prevent the PCB from sitting flush and cause keys to stick. Typically, 1-2mm of case foam around the perimeter is sufficient. You can also place a layer on the inside of the top case if you want maximum dampening.
-
Check alignment: Before reassembling, ensure the PCB and plate align properly with the case. Press down gently to confirm everything sits flush. If you encounter resistance, check for foam bunching or debris.
Testing And Fine-Tuning
Once you’ve reassembled, test thoroughly before declaring the mod complete.
-
Reconnect and power on: Plug in your keyboard (or power it on if wireless) and run through all keys. Use a keyboard testing website like KeyTester or your OS’s keyboard settings to verify every key registers. Check for any stuck or unresponsive keys.
-
Listen and feel: Type a few paragraphs of test text. Pay attention to the sound signature (deeper, more muffled) and the feel (softer bottom-out?). Does the change match what you hoped for? If a particular area sounds off, that’s data for fine-tuning.
-
Identify problem areas: If stabilized keys rattle excessively or feel gummy, you likely need to adjust stabilizer foam. If the overall sound is still too bright or resonant, your PCB foam might not be optimal. A common solution is moving to thicker or denser foam in subsequent attempts.
-
Reassess after break-in: Foam settles over the first 1-2 weeks of use. If your mod feels slightly different after a few days, that’s normal. Give it time before making major changes.
Common Mistakes To Avoid When Foam Modding
Even with a solid plan, small missteps can derail your mod. Knowing what goes wrong helps you avoid costly do-overs.
Over-stuffing with foam: The most common mistake. Builders think more foam = better results, but excess foam prevents the PCB from sitting properly, causes keys to stick, and can even trigger electrical shorts. Start conservative, you can always add more foam. Removing it from a fully assembled board is a pain.
Using the wrong foam type: Generic packing foam, memory foam, or foam from craft stores is too soft or degrades quickly. It won’t provide consistent dampening and may shed particles that damage your switches. Always use materials designed for keyboard modding. Sites like How-To Geek have guides on identifying quality materials, and TechRadar reviews stabilizer and dampening products regularly.
Skipping the cleaning step: Dust and residue prevent foam from adhering and create unwanted texture under your fingers. Always clean with isopropyl alcohol before foam installation. It takes five minutes and prevents hours of regret.
Not checking stabilizer alignment: Stabilizers that aren’t perfectly centered or adjusted will still rattle even with foam. Before adding foam, ensure stabilizers are properly clipped or soldered. If your stabilizers are already damaged or misaligned, foam is a band-aid, not a cure.
Forcing foam into tight spaces: If foam doesn’t fit naturally, don’t force it. Compressed foam loses effectiveness and can pop out during use. Better to cut a custom piece or use thinner foam than to jam material in.
Overlooking the PCB underside: Some builders only foam the case interior but forget the underside of the PCB. For max impact, place foam between the PCB and case. This decouples the two structures and reduces resonance transfer.
Reassembling too quickly: After installing foam, especially PCB foam with adhesive, wait 30 seconds to a minute before reassembling. Adhesive needs time to set. Quick reassembly can cause the foam to shift, creating uneven pressure or gaps that defeat the purpose.
Not testing methodically: Fire up your keyboard and assume it works. Test every key individually, especially stabilized keys. A single stuck key discovered hours later is frustrating. Use a keyboard tester tool to verify functionality before declaring victory.
Foam Modding Tips For Different Keyboard Types
Not all keyboards are created equal, and foam modding strategies vary depending on your board’s architecture and intended use.
Mechanical Gaming Keyboards
Most mainstream gaming keyboards (think Corsair K95, SteelSeries Apex Pro, Razer Huntsman) are hot-swappable or solderable mechanical boards. These are ideal candidates for foam modding because they typically have standard layouts and easily accessible PCBs.
Hot-swappable boards (most common in 2026): These allow you to pop out individual switches without a soldering iron. Advantage: easier disassembly and easier to test foam changes by removing just the top assembly. Approach: install stabilizer foam, PCB foam, and case foam as described. Since you can swap switches quickly, you can also experiment with different switch types to pair with your foam mods. A linear switch pairs differently with foam than a tactile switch.
Solderable boards (some premium gaming keyboards and custom builds): These require desoldering switches if you want full access, or you can mod around them. Approach: you can still add stabilizer foam (clip-on stabilizers are common) and case foam. PCB foam is trickier because you can’t remove the switches. Some builders apply a thin PCB foam between the mounting plate and the case instead. Alternatively, solder-in stabilizers are often modified with foam tape applied directly to the clip mechanism.
Gasket-mounted boards (increasingly popular in gaming): These use a mounting system where the PCB “floats” on gasket strips or silicone pieces. Foam here works differently because the board is already somewhat decoupled. Most builders still use stabilizer and case foam but go lighter on PCB foam to avoid over-dampening. The goal is to complement the gasket isolation, not fight it.
For gaming specifically, remember that foam reduces switch-level vibration. This doesn’t change actuation speed or registration timing, your APM and click consistency are unaffected. What changes is comfort and sound isolation, which matter for long gaming sessions and streaming.
Wireless And Budget Keyboards
Wireless and budget keyboards present different challenges.
Budget mechanical boards (under $100): These often have cheaper stabilizers and thinner cases, which actually means foam mods have higher impact. A $50 keyboard with stabilizer and PCB foam can feel dramatically better than stock. The downside: assembly is sometimes trickier, screws might be glued or stripped, and internals are often tighter. Be extra cautious with disassembly.
Wireless keyboards: Follow the same process, but be aware of battery compartments and wireless modules. Don’t let foam contact battery terminals or internals. If your wireless board has a removable battery, remove it before modding. If it’s internal, avoid foam in that compartment entirely. Wireless boards also tend to have tighter cases, measure twice, cut once.
Chiclet and low-profile boards (laptop-style, or ultra-thin gaming boards): These have less internal space, so traditional foam modding is limited. Instead, focus on case dampening and skip PCB foam if space is tight. Some builders use ultra-thin adhesive-backed foam designed for these narrow gaps. The effect is subtle but noticeable.
Across all keyboard types, the principle remains: identify the biggest acoustic offenders (usually stabilizers and the case resonance) and target those first. Customization comes later once you’ve nailed the basics. For budget conscious gamers, understanding the hierarchy of impact (stabilizer foam > PCB foam > case foam) lets you prioritize spending on the mods that matter most.
Measuring Results: How To Evaluate Your Foam Mod Changes
After spending time and money on mods, you’ll want to know if they actually worked. Unlike switch swaps where changes are obvious, foam is subtle. Proper evaluation prevents buyer’s remorse and guides future adjustments.
Listen critically: Before modding, record a short sound sample of your keyboard using a phone or voice recorder. Type a few paragraphs at normal speed. After modding, record the same passage and compare. You should notice a difference in pitch (lower frequency “thock” instead of high-pitched “clack”) and overall volume. If there’s zero difference, your foam might be too thin, poorly placed, or your keyboard might not respond well to foam (some ultra-premium boards are already heavily damped).
Feel the difference during typing: Spend at least an hour typing naturally. Pay attention to bottom-out sensation, finger fatigue, and tactile feedback. For gaming, run through your main title and assess if the feel is noticeably softer or more controlled. If you notice reduced hand fatigue after a two-hour gaming session compared to pre-mod, that’s a win.
Measure decibel levels: If you have access to a sound meter app (most smartphones have basic options, though they’re not perfectly accurate), measure the sound level of your keyboard before and after modding. A 3-5 dB reduction is noticeable: 8-10 dB is substantial. This is mostly for curiosity, your ears are the real tool here, but data satisfies the analytical gamer.
A/B test with others: Ask a friend or roommate to listen to your keyboard before and after. Explain your changes but let them form their own impression first. Subjective feedback reveals whether the mod achieves your goal (e.g., “Is it quieter for you?” or “Does it sound different?”).
Test specific keys: Stabilized keys (spacebar, shift, enter) should feel noticeably different if you applied stabilizer foam correctly. They should be quieter and less ratty. If they feel identical, re-examine your stabilizer foam application.
Consider the placebo factor: Enthusiasm can blur judgment. If you invested time and money, you might convince yourself the mod worked even if it didn’t. Be honest. If you’re not hearing or feeling a clear improvement after two weeks, something’s off. Either reapply foam, adjust placement, or try a different foam type. PCMag and other tech reviewers frequently test keyboard modifications, and their methodologies can inform your own evaluation.
Document changes for future reference: Note which specific foam types, thicknesses, and placements you used. If this mod is successful, you can replicate it on other boards. If it’s not, you know what to avoid next time. Keyboard modding is iterative: each attempt teaches you something.
Conclusion
Foam modding your keyboard is an accessible, affordable way to dramatically improve your typing and gaming experience. Whether you’re chasing that coveted deeper sound signature, reducing noise for your roommates, or simply enjoying the process of customizing your gear, the fundamentals are straightforward: identify your goal, source appropriate materials, follow the modding steps carefully, and evaluate results honestly.
The barrier to entry is low, quality foam, tools, and stabilizer kits cost $15-40 total, and the potential payoff is significant. You’ll develop hands-on knowledge of your keyboard’s architecture, join a passionate community of modders and enthusiasts, and end up with a board that feels uniquely yours. Start with stabilizer foam and PCB foam on a keyboard you use daily, observe how the mod affects your experience, and build from there. The guide to revolutionizing your gameplay through modding explores deeper customization approaches once you’ve mastered the basics.
Most importantly, remember that foam modding is experimental. Your first attempt might be perfect, or you might need to adjust. Either way, you’re gaining valuable experience with your gear. In a hobby where precision and personal preference matter as much as raw performance, that knowledge is invaluable.